

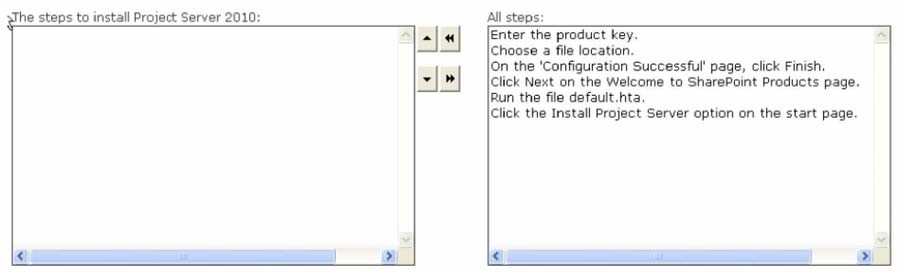
Choose and reorder the steps to install Project Server 2010.

A.
1.Run the file default.hta on the Project Server 2010 DVD.
2.Click the Install Project Server option on the start page.
3.Type the product key, on the ‘Enter your Product Key’ page, and then click Continue.
4.Review the terms of the agreement and select the ‘I accept the terms of this agreement’ check box, in the ‘End User License Agreement’ page to accept the agreement.
5.Click Continue.
6.Click the ‘Install Now’ option on the ‘Choose a file location’ page.
7.After the installation process is complete, click Close.
8.When the SharePoint Products Configuration Wizard starts, click Next on the Welcome to SharePoint Products page.
9.On the warning dialog box, click Yes.
10.On the ‘Configuration Successful’ page, click Finish. When the SharePoint Products Configuration Wizard finishes, a PWA site is created automatically by the system. The PWA site can be accessed via the following path:
http:///pwa.
B.
1.Run the file default.hta on the Project Server 2010 DVD.
2.Click the ‘Install Now’ option on the ‘Choose a file location’ page.
3.Type the product key, on the ‘Enter your Product Key’ page, and then click Continue.
4.Review the terms of the agreement and select the ‘I accept the terms of this agreement’ check box, in the ‘End User License Agreement’ page to accept the agreement.
5.Click Continue.
6.Click the Install Project Server option on the start page. .
7.After the installation process is complete, click Close.
8.When the SharePoint Products Configuration Wizard starts, click Next on the Welcome to SharePoint Products page.
9.On the warning dialog box, click Yes.
10.On the ‘Configuration Successful’ page, click Finish. When the SharePoint Products Configuration Wizard finishes, a PWA site is created automatically by the system. The PWA site can be accessed via the following path:
http:///pwa.
C.
1.Run the file default.hta on the Project Server 2010 DVD.
2.Click the Install Project Server option on the start page.
3.Click Continue.
4.Review the terms of the agreement and select the ‘I accept the terms of this agreement’ check box, in the ‘End User License Agreement’ page to accept the agreement.
5.Type the product key, on the ‘Enter your Product Key’ page, and then click Continue.
6.Click the ‘Install Now’ option on the ‘Choose a file location’ page.
7.After the installation process is complete, click Close.
8.When the SharePoint Products Configuration Wizard starts, click Next on the Welcome to SharePoint Products page.
9.On the warning dialog box, click Yes.
10.On the ‘Configuration Successful’ page, click Finish. When the SharePoint Products Configuration Wizard finishes, a PWA site is created automatically by the system. The PWA site can be accessed via the following path:
http:///pwa.
D.
1.Run the file default.hta on the Project Server 2010 DVD.
2.Click the Install Project Server option on the start page.
3.Type the product key, on the ‘Enter your Product Key’ page, and then click Continue.
4.Review the terms of the agreement and select the ‘I accept the terms of this agreement’ check box, in the ‘End User License Agreement’ page to accept the agreement.
5.Click Continue.
6.On the warning dialog box, click Yes.
7.After the installation process is complete, click Close.
8.When the SharePoint Products Configuration Wizard starts, click Next on the Welcome to SharePoint Products page.
9.Click the ‘Install Now’ option on the ‘Choose a file location’ page.
10.On the ‘Configuration Successful’ page, click Finish. When the SharePoint Products Configuration Wizard finishes, a PWA site is created automatically by the system. The PWA site can be accessed via the following path:
http:///pwa.
Explanation:
The steps to install Project Server 2010 are as follows:
1.Run the file default.hta on the Project Server 2010 DVD.
2.Click the Install Project Server option on the start page.
3.Type the product key, on the ‘Enter your Product Key’ page, and then click Continue.
4.Review the terms of the agreement and select the ‘I accept the terms of this agreement’ check box, in the ‘End User License Agreement’ page to accept the agreement.
5.Click Continue.
6.Click the ‘Install Now’ option on the ‘Choose a file location’ page.
7.After the installation process is complete, click Close.
8.When the SharePoint Products Configuration Wizard starts, click Next on the Welcome to SharePoint Products page.
9.On the warning dialog box, click Yes.
10.On the ‘Configuration Successful’ page, click Finish. When the SharePoint Products Configuration Wizard finishes, a PWA site is created automatically by the system. The PWA site can be accessed via the following path:
http:///pwa.