

DRAG DROP
You plan to deploy a new public-facing website on an Azure virtual machine (VM) by using the Azure Resource
Manager (ARM). You have an existing cloud service and a storage account in the Azure subscription.
You need to create and deploy the VM.
Which five actions should you perform in sequence? To answer, move the appropriate actions from the list of
actions to the answer area and arrange them in the correct order.
Select and Place:
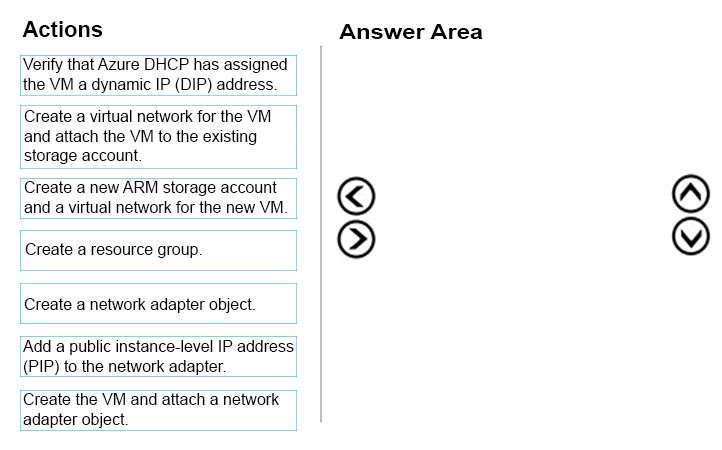

Answer: 
Why not create a Resource group?
0
1
since it already stated that “You have an existing cloud service and a storage account in the Azure subscription”
My personal answer is:
(The first 3 can be found when creating new VM)
Create a resource group
Create a virtual network for the VM and attach the VM to the existing storage account
Add a public instance-level IP address (PIP) to the network adapter
(There’s no create network adapater options when creating new VM in ARM portal, so i would assume below 2 will be done by Azure on backend once submitted)
Create a network adapter object
Create the VM and attach a network adapter object
0
0
I believe you create a PIP before the NIC….
0
0
This is not really matter in actual work, u can do one way or another.
But from the words written down the answer looks right.
0
0
The answer looks right to me. Cloud Service and Storage Account are concepts of Classic portal.
Because of this you need to create the infrastructure for ARM build.
1) Create Resource Group ==> always first 🙂
2) Create the ARM Storage (notice how it specifies this is ARM Storage Account) and Virtual Network
3) Create Virtual Network Adapter
4) Add Public IP address to NIC
5) Create VM and associate with Network Adapter (which is associated with Subnet/vNET)
Pretty much step by step of what your powershell commands would be to build this out.
# (1) Build the Resource Group
$rg = New-AzureRmResourceGroup -Name BlowMe -Location EastUS
## (2) Create the ARM Storage and Virtual Network
# Create a subnet configuration
$subnetConfig = New-AzureRmVirtualNetworkSubnetConfig -Name mySubnet -AddressPrefix 192.168.1.0/24
# Create a virtual network
$vnet = New-AzureRmVirtualNetwork -ResourceGroupName $rg -Location EastUS -Name MYvNET -AddressPrefix 192.168.0.0/16 -Subnet $subnetConfig
$sa = New-AzureRmStorageAccount -ResourceGroupName $rg–StorageAccountName fucktonofstorage1
# Create a public IP address and specify a DNS name
$pip = New-AzureRmPublicIpAddress -ResourceGroupName myResourceGroup -Location EastUS -AllocationMethod Static -IdleTimeoutInMinutes 4 -Name “mypublicdns$(Get-Random)”
# Create a virtual network card and associate with public IP address and NSG
$nic = New-AzureRmNetworkInterface -Name myNic -ResourceGroup $rg -Location EastUS -SubnetId $vnet.Subnets[0].Id -PublicIpAddressId $pip.Id
# Define a credential object
$cred = Get-Credential
# Create a virtual machine configuration
$vmConfig = New-AzureRmVMConfig -VMName myVM -VMSize Standard_DS2 | Set-AzureRmVMOperatingSystem -Windows -ComputerName myVM -Credential $cred | Set-AzureRmVMSourceImage -PublisherName MicrosoftWindowsServer -Offer WindowsServer -Skus 2016-Datacenter -Version latest | Add-AzureRmVMNetworkInterface -Id $nic.Id
# Build the Damn VM
New-AzureRmVM -ResourceGroupName $rg -Location EastUS -VM $vmConfig
The only part that through me for a loop was nowhere are we creating the PIP that we are assigning to the NIC. Guess it’s just assumed that we did this step.
1
0
Perfect
0
0
Thanks for detailed information.
0
0
By the way, part of the new 243Q 70-533 dumps are available here:
https://drive.google.com/open?id=0B-ob6L_QjGLpfnV3MVl6X3pXOWw1Z3YtQUpJRVRiTkNkbGNFbVBNRXhjSkw3bWk1WHdYcW8
Best Regards!
0
0